Tuesday, July 30, 2013

Naturally Clean: Homemade Dishwasher Detergent


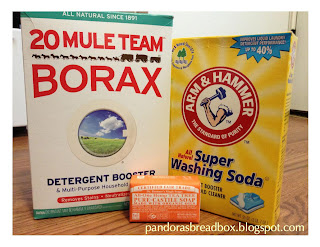
This is another thing that had been on my to-do list for a very long time. I found a recipe from The Eco-Friendly Family for a dishwasher detergent that doesn't contain Borax. Although I use Borax in my laundry detergent, there is a bit of a controversy surrounding it. Borax is listed as being hazardous but only if ingested in large amounts, so I feel more comfortable eliminating it altogether from food and eating surfaces.

To preface the recipe, let me tell you about my dishwasher. When we first moved into our current town home, the dishwasher quit working after 2 wash cycles. I called the landlords and twice they sent someone over to fix it to no avail. They decided to just install a new one. My dishwasher is a little over a year old and it never really cleaned dishes. You have to excessively pre rinse so that it doesn't throw food chunks all over your other dishes. I have to be careful where certain things are placed in the dishwasher or they won't get clean. In other words, we have a bottom of the barrel quality dishwasher. Oh yeah, and hard water on top of that. Some days I felt like I might've been better off just hand washing everything. I was using liquid Cascade for years and it did an alright job but it would leave these weird white spots all over things. Even with Jet Dry, and I eventually switched that out for white vinegar. I don't know if it was soap goo or hard water minerals or what. All I know is I didn't want whatever that was in my food.

I already had most of the ingredients for the detergent except the sea salt and the Lemi-Shine. I do a lot of cleaning with baking soda and I had the washing soda from making laundry detergent. The great thing about the Lemi-Shine and salt is that they soften your water if it's hard. After a week's worth of washes, not once had there been any weird white spots on anything. Sold! It does a good job at getting everything clean, too. Everything should be easily available at your local grocery or big box store.

12 oz container of Lemi-Shine (found with the dish detergents)
1 1/2 cups washing soda
1/2 cup baking soda
1/2 cup sea salt

Mix it all together and store in a dry container. Use 2 tablespoons per load. I like to use white vinegar in the Jet Dry dispenser.

Tuesday, July 16, 2013

The No 'Poo Method: Week 1

Day 1: Prepared all the info and supplies to begin the No 'Poo adventure.

Day 2: I washed my hair with a clarifying shampoo 3 times. After doing that, I was convinced that there was no way on earth this was going to work and debated just smothering my hair with my usual conditioner. My hair had the consistency of "been bleached one too many times and just got out of a chlorinated pool." Ew. There was no way spraying vinegar and water on it was going to do anything. I did it anyway. After a million rinses I dried off my hair and grabbed my hair pick. Shockingly, it went right through my hair easier than if I had used a mountain of conditioner. I seriously seriously couldn't believe it. I thought for sure this was going to be a one-day failure.

Day 3: I didn't notice anything out of the ordinary.

Day 4: My hair started to smell a little funky to me so I washed it with a mixture of baking soda and water and did the regular vinegar and water conditioner. Everything seemed to be fine. Still no problem combing out my hair.

Day 5: Still good.

Day 6: I was starting to get paranoid so I asked my husband to smell my head. Sure enough, I was smelling a bit "off." He suggested I use a bit of essential oils in the baking soda mixture. Brilliant! I also decided that adding a bit more baking soda might be a good idea. I mixed up 1 1/2 cups of water with 3 Tbsp baking soda and 5 drops of Tea Tree essential oil. I scrubbed my scalp extra long this time just to make sure. Afterwards I could still smell the Tea tree oil. It smells nice.

Day 7: I asked my husband to smell my head again and he said it didn't smell like anything at all. I'd consider that a success. Maybe this will be a winning combination.

Overall, my hair doesn't feel greasy or like straw. My scalp isn't itchy and doesn't feel dirty. My hair does feel a bit softer and less coarse, though. I think if I keep up with the essential oils, I won't have to be paranoid about smelly hair, either. I did read about putting essential oils on your brush, too. I may try that.

Tuesday, July 9, 2013

The No 'Poo Method: An Introduction

A few years ago I stumbled upon a web page about a way to keep your hair clean without shampoo or conditioner. It's called the no 'poo (no shampoo) method and it is a natural, chemical free way to keep your hair nice and clean.

Wait, you mean no shampoo? Like ever? Have you lost your mind?

Possibly. And for those of you who know me, I'm a former hair stylist...seriously. But I want to give it a real try.

Starting today, I'm going to try to do this for an entire month to see how it goes. I'll give a full report at the end of each week. And if I like it, I'll never use shampoo again!

I got lots of great information here.

The basic rundown of the no 'poo method is cleansing the hair with baking soda and water and then conditioning with vinegar and water. When we use shampoo, it strips our hair of the natural oils and then we need conditioner to replace them. The scalp notices the natural oils missing and kicks it into overdrive to make up for the lost oil, causing hair to become greasy. It seems to me that the only reason you need to use shampoo is because you used shampoo. Sounds kind of gimmicky to me. Baking soda is able to cleanse the hair and scalp without removing the natural oils so your hair can stay naturally conditioned. Not only does shampoo itself seem unnecessary but most shampoos on the market are full of things that you might want to think twice about putting on your body. I also read that this works wonders for curly hair, and having naturally curly hair, I am very interested to see if this holds true. There are a lot of products on the market that make all kinds of promises, and being a former hair dresser, I've quite literally tried almost all of them, but they never deliver. I know my fellow curly heads can attest to that. So here starts day one and come back next week to see how the first week went!

Tuesday, July 2, 2013

Product Review: Rubbermaid Reveal Mop

Before I start, I want to state that I was not asked or paid to write this by any person or company. I purchased this item on my own with my own money.


After the death of my Shark steam mop, (and by death, I mean explosion) I went to Home Depot looking for some sort of replacement. Not necessarily another steam mop, but something to quick clean the floors between scrubbings. The only thing that initially came to mind, and what first ended up in my cart, was the Swiffer and a pack of the wet wipes. I can't even begin to describe the knot that appeared in my stomach over this. I'm probably a bit more neurotic than your average person...ok a lot more, but the thought of those chemicals in my house left me feeling extremely uneasy. Not to mention all of the waste. My husband suggested finding a reusable cover for the Swiffer and just not using the bottle of spray chemicals that came with it. That sounded like a better idea and we were off to try and find something that would fit. Unfortunately, there weren't any appropriate options. I was still feeling a bit defeated when my husband pulled down a Rubbermaid Reveal Mop. After looking it over, I realized this was the perfect product for me. It is a spray mop with reusable cloth cleaning pads that velcro onto the bottom and an empty bottle to fill with whatever cleaning solution you prefer. Vinegar and water in my case! All my problems were solved at once! No waste and no chemicals!

The mop itself is self explanatory. Pull out the bottle and fill with cleaner, replace. The mop handle is a comfortable length and the spray handle is convenient and easy. The cloth pads are absorbent and were able to scrub away grime with ease. My toddler's food-throwing is no match for this thing. Afterwards, I threw the cloth pad in the wash with a load of towels and it came out nice and clean. It's extremely lightweight and can be stored anywhere you keep mops, brooms, etc.

I would most definitely recommend this product over any other mops on the market. I never did like Swiffers, anyway. I never felt like they really cleaned. The Reveal does.


Tuesday, June 25, 2013

Naturally Clean: Homemade Laundry Detergent


For the longest time, I've been wanting to make a homemade laundry detergent. I did some research and found out that most are made from just 3 ingredients. While the ratios can vary, it seems that you can just use equal parts grated castile soap, washing soda, and borax. I saw some recipes included baking soda. I didn't add any to mine but I might try that later. Although I used equal parts, you could always adjust the ingredients based on your own laundry needs.

Why bother? Well, most commercial laundry detergents contain ingredients that aren't biodegradable. Every ingredient in this soap is, and it's all natural. It's so gentle it can even be used for baby clothes. My son has sensitive skin and has had no adverse reactions. The other good reason? It's extremely cheap!

I tested this detergent for a little over a week and I've been very happy with the results. It leaves my laundry soft and smelling fresh. I used it on sheets, blankets, clothes, and towels. The only thing that I did not wash was my cloth diapers. I read that the castile soap can leave a film and cause repelling so I decided to keep using my Country Save for diapers. In the future, I may try it out on just flats and prefolds.

So here's exactly what I ended up using but feel free to change it up or use different scents:

1 bar of Dr. Bronner's Hemp Tea Tree pure castile soap grated (~2 cups)
2 cups Arm and Hammer washing soda
2 cups Borax

I have an HE washer so I use one tablespoon per load. If you have a top loader, 2 tablespoons is recommended. I tested on hot, warm, and cold washes. It works well on hot and warm as is. If you are going to use it for cold washing, I recommend dissolving it in some warm water before adding it to your wash.

With this recipe you'll get about 96 HE loads or 48 conventional loads.

Tuesday, June 18, 2013

Naturally Clean: The Many Uses of Baking Soda


Baking soda is a great natural green cleaner and it has an almost endless number of uses. I mainly use it as a scrubbing agent and a carpet freshener. When it's paired with a 50/50 mix of vinegar and water, you can clean pretty much everything in your house. It's safe, non-toxic, environmentally friendly and DIRT CHEAP. You can even use baking soda and vinegar as shampoo and conditioner, respectively. (More on that in a week or two!)

Some of the other common uses of baking soda:

-toothpaste
-deodorant ingredient (homemade)
-acid/upset stomach relief
-deodorizer (household)
-moisture absorber (household)
-detox bath
-shampoo
-laundry booster
-face scrub


To use as a scrubbing agent, simply sprinkle a generous amount over the surface and scrub with a sponge. It's amazing how it cleans and gets rid of hard-to-remove gunk. It's especially great for stovetops, sinks, and bathtubs. I also use it in the toilet. It makes my surfaces shine. Take a look for yourself.


It even got out the coffee stains. I <3 this stuff.

To use as a carpet freshener simply sprinkle around your carpet and let it sit for about 30 minutes. Then vacuum normally. You could also add some essential oils to your baking soda before sprinkling it onto your carpet for added fragrance and freshness.

Tuesday, June 4, 2013

Naturally Clean: Cinnamon and Honey for Acne

I've always been concerned about the state of my skin. I've tried almost every face wash, mask, and spot treatment on the market, all to no avail. Since my pregnancy and birth of my son, my face has only gotten worse. Yeah, all those things I heard about glowing skin during pregnancy...lies! At least, for me it was. Ever since then, it has persisted. Hooray hormones.

I never even thought twice about buying face goo from the drug store and slapping it on my face in the hopes that it would perform some miracle. I also never bothered to read the ingredients. There's some pretty questionable things in a lot of skin care products and all of those questionable ingredients aren't going to just sit on the surface of your face. They are going to be absorbed into your body. Not to mention, they just plain don't work!

My sister started mixing honey and cinnamon and using it as a face mask. She insisted it was amazing and it got me curious to try it myself. At the time I first gave it a try, I had a mountain of a zit on my face. I mixed up the honey and cinnamon and smeared it all over my face and let it sit for about 15 minutes. I rinsed completely and let my face dry naturally. In a few minutes, I noticed results. I'm not even exaggerating when I say the zit had shrunk to about half its original size. Not only that, but I noticed my skin tightening and my pores were also noticeably smaller. I finally witnessed a real skin care miracle and it had been hiding in my kitchen the whole time.

Honey is naturally antibacterial. By leaving it on your face, the bacteria can't survive and dies. Cinnamon is anti-inflammatory and helps reduce the redness and swelling of acne. Here's how to make your own:

Make sure your honey is actually 100% honey. Check out your local farmer's market, bee farm, health food store, or organic section of your grocery store. Scoop a small amount into a bowl. Sprinkle generously with cinnamon and stir until you have a thick paste. You may need to add more cinnamon. Spread on affected areas or all over as a mask and let sit for 10-15 minutes. Gently wipe off or rinse with warm water. Let your face air dry. Apply a thin layer of coconut oil to replenish your skin's natural protectant and moisture. Repeat daily.

Sunday, May 26, 2013

Flats and Handwashing Challenge: My Conclusions from the Week

It's the final day of the Flats and Handwashing Challenge hosted by Dirty Diaper Laundry.

When I initially thought about doing this challenge and actually starting it, I thought the whole thing was going to be a piece of cake. I was right and wrong.

It started out easy and it ended easy and I really only encountered one problem which could be easily remedied. We had no issues with the flats leaking or not getting clean. We had no issues getting a good fit. We had no issues with traveling. The only things I would probably change would be the way they are washed, if handwashing long term, and also finding a different solution for hanging them to dry.

I was nervous about taking my son out for the first time with nothing but flats. I even grabbed a few disposables, mainly as some sort of nonsensical security blanket. (at least it seems nonsensical now) I have no idea why I thought that traveling, going out, and night time meant that disposables were my only solution. The answer had been in front of my face the whole time. Traveling with flats has actually proven to be easier than worrying about disposables. I don't have to worry about running out and the next time I head to PA to visit family, I'm bringing my flats and I will just use my mom's washing machine and clothesline. And also, in case you were wondering, I haven't missed my diaper sprayer at all. Swishing and dunking in the toilet works just fine.

For anyone who is in need of diapers and not able to afford disposables, I would very much recommend using flats and covers. If you have a washing machine, even better. If you don't, it is completely doable. If you're going to use the camping style bucket and plunger washer, get gloves! I would recommend taking turns with the chore, as well. But as far as everything goes, you just have to dive in and see what works for you and then tweak everything according to you and your family's needs and situation. Although I don't think I can give a 100% fair opinion, since I can have my washing machine back as soon as we get home, I still think that if you are determined to cloth diaper, you have family support, and you see all the many benefits of cloth, you can most definitely be successful.

As far as how this changes my own perspective on cloth, I'm not entirely sure why I felt it necessary to purchase so many pocket diapers in the first place. They aren't really any easier. I feel that they only give the illusion that they are easier, since they look similar to the disposables that we have all been conditioned to accept as the norm. The reason I started using disposables at night was due to the pocket diapers repelling and having to wash all the bed sheets almost every day. The flats never once leaked and have amazing absorption qualities. Way to go natural fibers!

To be perfectly honest, I didn't think it was going to change my opinion on the way I was already cloth diapering, but it has. You can't go wrong with cheap and effective, as long as you don't mind putting forth a bit of extra effort in laundry.

Saturday, May 25, 2013

Flats and Handwashing Challenge: Traveling with Flats

Yes, you read that title correctly. We crossed state lines with nothing but flats, the wash bucket and plunger, and 2 emergency disposables (just in case all heck broke loose). So far, it's been no big deal. We drove from upstate NY to central PA to visit family for the Memorial Day weekend. I broke the news to my mom that I'd be handwashing dirty diapers in her bathtub. Her response? "I don't care." I figured as much. Plus, my mom has a clothesline in her yard! Yay!

We brought along all 24 large flats, 5 covers, and the cleaning supplies. I kept a wet bag in the diaper bag and he only needed one diaper change in the 5 hour drive. Once at my parents' house, diaper changes were no different than at my house. I ended up not washing my diapers last evening because I got so distracted with spending time with my family. I'm headed to do that now and I'll let you know how that goes later. But I can tell you one thing, I'm really excited about hanging them out to dry!

***

It's 2:30 and I have washed diapers, hung them out to dry, and taken them down and folded them. In this specific situation, I would have to say that handwashing diapers is much easier at my mother's house than mine. Her bathroom is much more spacious and of course, the clothesline. We are going to continue to cloth diaper and handwash for the rest of the weekend in a hotel room and I don't think it's going to be much different with the exception of drying them.

Normally I would have travelled with a few packs of disposables and never even given thought to taking cloth diapers with me. After doing this, it's really not a big deal and I think I will actually be doing this again on future trips.

Friday, May 24, 2013

Flats and Handwashing Challenge: The Ups and Downs

I think it's better to end a post on a positive note so I'll start with the things that aren't working out so well and end with what is working.

I think my main complaint would have to be the drying. Like I stated in Wednesday's post, I have no way to dry my diapers outdoors and the basement is too humid. To get them dry I have to drape them over baby gates, chairs, doorknobs, and anything else I can find. I suppose this would be no different than handwashing in the middle of winter, for some. If I were going to do this long-term, I would definitely find a different method and probably set up a retractable clothesline in the nursery. The washing does get tedious after a couple of days. I haven't been using any gloves but I would highly recommend it! My hands are getting pretty sore. Other than that there haven't really been any problems.

The flats are definitely working and we've had no leaks or blowouts at all. There has been no issues with fitting, either. Nighttime has actually been quite surprising. He has woken up inexplicably dry every morning, which I'm sure is extremely rare for a 14 month old. He hasn't woken up with extremely wet diapers for a month or so now, anyway. I've also been using stay-dry fleece liners, which have been a tremendous help.

I took my son out to a local coffee shop yesterday (don't worry, he just had water, haha) and took some flats along. I ended up having to change a messy diaper with no problems. I normally would've put him either in disposables or a pocket diaper for an outing but I wanted to complete the flats challenge. I found out that it really wasn't a big deal. Just make sure you have a few flats and an extra cover packed. Easy peasy.

Overall, if there was a better way for me to handwash and dry, I don't really see any problems with using flats and covers full time.

Thursday, May 23, 2013

Flats and Handwashing Challenge: Wash Routine

It's day 4 of the Flats and Handwashing Challenge hosted by Dirty Diaper Laundry.

My wash routine has been pretty simple. I made a wash tub out of a 5 gallon bucket and a plunger. It works really well and wasn't as difficult to do as I had imagined.


I start by storing dirty diapers in the wash bucket. I've been washing the diapers every day because the fewer that are washed, the easier it is on your hands and arms. Every evening I haul the bucket to the bathroom and fill it up with lukewarm water. This is my pre-rinse. I plunge it for about 5 minutes and then drain all the water. Next I add a small amount of my detergent and fill it with the hottest water I can get. I let it sit for a few minutes (usually enough time to watch final Jeopardy, haha) and then I wash vigorously for five minutes. 

I then dump all that water out and fill it again with hot water. I add about 1/4 cup of vinegar and then plunge for another 5 minutes or so. Dump again, fill again with hot water and repeat without the vinegar. Dump water and fill with lukewarm water for final rinse. Swish until there are no more soap bubbles, remove diapers, wring and hang to dry.

It's pretty simple and it usually only takes me 30 minutes or so. It does take a bit of upper body stamina to do this but I keep the music going to help keep my mind off of it.

I make sure to smell my diapers after taking them out and they always smell clean to me.

I do want to say that while this isn't so bad for a week, I am very much looking forward to getting my washing machine back. Handwashing diapers is very doable but by no means is it an ideal situation. If I were in a situation where I did not have access to a washing machine, I would look for a different long-term washing option other than a bucket and plunger.

Wednesday, May 22, 2013

Flats and Handwashing Challenge: The "No Dryer" Blues

I've made it to day 3 of the Flats and Handwashing Challenge hosted by Dirty Diaper Laundry.

One might think that the handwashing would be the worst part of this whole thing. Not true for me. The first few days have been just fine with the exception of trying to dry diapers with no dryer. Where we live, I have no way to dry them outside. After the first washing on Monday night, I realized I hadn't thought about how or where I was going to dry my diapers! My hubby rigged two short makeshift clotheslines in our basement with 550 cord...a great "improvise, adapt, overcome" moment...oorah. (I can just picture my husband rolling his eyes as hard as he can right now.) I was thrilled to have the lines in the basement and happily threw the wet diapers over them and went to bed.

The next morning I went to the basement to collect my dry diapers and much to my surprise, they were still quite damp. For the past few days it has become incredibly humid here in Upstate New York. My whole house feels muggy and drying seems to be taking forever. I decided to just leave them there until they were more dry and then I would bring them upstairs and let them finish. When I went back a few hours later I discovered a dark brown line across every diaper where they had been touching the 550 cord. I found out later that it was the same cord my husband took with him to Afghanistan 3 years ago. My diapers were covered in Afghanistan dust! I had to wash them ALL OVER AGAIN. It was a panic moment and I was worried that I would somehow run out of clean diapers.

That evening, I put the diapers from that day and the previous day in the bucket and washed them all together. It was harder this time. Washing fewer at a time is definitely the way to go. Before hanging them up to dry last night, I first draped old towels over the cord before the diapers. Then I hung the majority of them around the living room, over chairs, baby gates, and whatever else was available. I was happy to wake up this morning to mostly dry diapers and by 9am, I had them all dried and folded. Crisis averted!

Now I know how to most efficiently dry my diapers WITHOUT getting them dirty all over again. And I am completely jealous of all of you out there with beautiful outdoor clotheslines! Don't take them for granted like I did with my dryer.

Tuesday, May 21, 2013

Flats and Handwashing Challenge: How Much Did I Spend?

Today is day 2 of the Flats and Handwashing Challenge hosted by Dirty Diaper Laundry.


I went back through my online order receipts and crunched the numbers of the supplies I'm using this week. As far as the flats and covers I'm using, they aren't really the cheapest options by any means but if this is the only up front amount you pay, thousands of dollars are still being saved.

The supplies I'm using this week and what I paid are as follows:

24 large unbleached Diaper Rite flats 40.50
12 small unbleached Diaper Rite flats 14.00
6 Flip covers 69.75

Grand total: $124.25

All of these were purchased at Diaper Junction over the past year and a half. I bought the flats while they were on sale and one of the Flip Covers I have was free.

I have some optional things that I'm using that make diapering a lot easier. These aren't necessary but they are nice to have.

6 bumGenius stay dry liners 11.90
16 homemade blizzard fleece liners 1.75
diaper sprayer 29.97

This brings my total up to 167.87.

There are less costly covers on the market that work just as well as the Flips. Instead of purchasing flats they can be made. XXL jersey t-shirts that you already own or from thrift stores can be made into flats. One shirt gives you two diapers. Jo-Ann Fabrics and other fabric stores sell birdseye cotton that is the material for traditional flat diapers. There are many options to get the price down considerably lower and some people have even been known to cloth diaper for under $50.


Monday, May 20, 2013

Flats and Handwashing Challenge: Why Am I Doing This?

Today is the first day of the Flats and Handwashing Challenge hosted by Dirty Diaper Laundry. I'll be participating this year and blogging about it every day this week.

Once upon a time, there were no such thing as disposable diapers. Everyone used cloth diapers before the invention of disposables. This week I will be using nothing but the very same diapers your grandma and great-grandma used, all without the use of my washing machine and dryer. Why on Earth would I do that? There are several reasons.

Cloth diapering is a valid option. Regardless of how much or how little money you make, there are ways to make cloth diapering work for your family. It's just a matter of trying it out and seeing what works for you. With using flats and handwashing them, the goal is to show that you can still cloth diaper even if you don't have a washing machine, dryer, or much money. Flats are the least expensive cloth diapering option. Sometimes they are even free. Buy flat diapers, use flour sack towels, cut up t-shirts from Goodwill. Almost any absorbent material can be turned into a diaper. You just need a waterproof cover and it's all good. There are many families out there struggling to afford disposable diapers and sometimes having to make the decision between that and food. Imagine never having to buy diapers again.

How prepared are you? Power outages, natural disasters, zombie apocalypses (hey you never know!) can happen any time. What if there is a diaper shortage. And if there was, wouldn't it be nice to have one less thing to worry about? Having cloth diapers on hand and a way to hand wash them will put you way ahead of the rest. I want to show all you preppers, survivalists, and potential homesteaders that flats are the way to go! They are the least bulky, the easiest to wash, the quickest to dry, and the most diverse diaper to have around. The diverse part is particularly good if you have more than one child in diapers. The same flat diaper can be customized to fit children of varying sizes.

Those are really the main points of my decision to do this. Although I've got something to prove and I want to make this work, I will be reporting my findings along the way with honesty. As much as I love cloth diapers and want everyone to give them a try, I'm not going to sugarcoat the reality of it. You sometimes do have to touch poop. But then again, that just comes with the territory of parenthood.

Tuesday, May 14, 2013

Naturally Clean: The Power of Vinegar

I've written about this before on my previous collaboration blog but I'm going to do it again. I'd like to do a mini series about green cleaning/chemical-free living and I'm going to start with the most basic thing to use: white distilled vinegar. We've all seen the millions of posts about making your own cleaners on Pinterest, and that is awesome. I'm here to tell you that if you haven't already tried them, you are missing out! I use a 50/50 mix of vinegar and water in a large spray bottle to clean EVERYTHING in my house. Every surface in the bathroom and kitchen, windows, mirrors, floors. The only thing I wouldn't recommend using it on is finished wood.

Cleaning with natural cleaners is something that is very important to me and I take it very seriously. A lot of the chemicals used in everyday household cleaning can cause a plethora of ailments including cancer. Women who work in the home were found to have a 54% increased risk for cancer than women who work outside of the home. Coming from a direct line of stay-at-home moms who are also breast cancer survivors, I want to lessen my odds in any way I can.

Vinegar is antibacterial, antifungal, kills mold, and absorbs odors. It really is the most perfect cleaner out there. You also have no worries about children or pets getting under the sink or being poisoned.

Now to get real with you. It cleans extremely well and I am very particular when it comes to dealing with germs and dirty surfaces. My stuff gets clean. Clean enough that I feel comfortable letting my child eat off his high chair tray after being wiped down with vinegar. (hey, I'd rather that than some toxic chemical...vinegar is food!) It does require some extra elbow grease but that's no big deal in my book. I will admit that a few weeks ago I ended up cleaning some glass in the house with some leftover Windex and holy heck. My eyes burned, my throat got sore, my lungs hurt. That was enough to really give me the final push over the edge to say no to cleaning chemicals forever.

Some of the benefits of natural cleaning are better health for you and your family, better health for the environment, and more money in your pocket, which everyone can appreciate.

Stay tuned for more natural cleaning tips in the following weeks.


Tuesday, April 30, 2013

Making Lifestyle Changes

Some weeks I have no idea what to write. Let's change pace a little and instead of a recipe or tutorial, I'll just "keep it real."

Friday was our 3 year wedding anniversary. As a gift to ourselves, we made a pact to get healthy so we can get as many more years out of our marriage as possible. We got a juicer, found a detox plan, and started running.

I've never been a runner in my life. I've always thought I would like to but I was also a smoker for almost 10 years. Those two things don't really go together. I'm actually coming up on my 2-year-smoke-free anniversary. So back to running. I knew it was going to be hard. I knew I wasn't going to be running miles (or even one) on the first try. I took it slow and went two intervals walking then running. In total I probably ran a half a mile. It's interesting, though, all the things you notice when you run for the first time. I had to think about breathing so I didn't start hyperventilating. That was a chore in itself. Also, my belly jiggles. That was a sort of disturbing experience. And fighting the urge to give up. Because, holy crap, it was almost every second. I kept making myself mini challenges and then going past them. "Make it to the lamp post and you can turn around...ok, now the tree...now the bench...etc" It worked. After making it past the initial super difficult part, it suddenly got a bit easier. So if anyone out there is thinking about starting running, do it! It's not easy and it is going to hurt but the amazing feeling you get afterwards is worth it.

Today officially starts the detox program. Hubby and I are working toward a 15 day vegetable and fruit based detox plan. I'm not sure how it's going to go. It will most likely be difficult. I can already predict my body screaming for carbs. And just for fun-sies, here's a picture of our refrigerator.


In case you were wondering, yes, there are 6 bunches of kale in there. So much green...

Tuesday, April 23, 2013

The Great Cloth Diaper Change 2013


This was the first year I attended The Great Cloth Diaper Change on April 20. What it is is a grass-roots movement to bring awareness about cloth diapering. It is an event that happens all around the world where an attempt is made to have the most cloth diapers changed. It started in 2011 and the 2012 turnout broke the 2011 Guinness record for most cloth diapers changed at one time.

Here are the guidelines for participation:
 Each participant (adult over the age of 18) must be paired with one child 39 inches or shorter. 
 Each child must be changed into a cloth, reusable diaper that can be purchased online, at a brick & mortar store, or is offered through a diaper service.  It does not matter what type of diaper a child arrives in.
 At the sound of a loud start signal, all participants must remove their child’s diaper and properly put on a 100% reusable cloth diaper.
 Before the signal to start, each participant should hold the clean diaper they will change the baby into high in the air.  The photographer should take “before” shots.
 At the signal to start, each participant should change his or her child’s diaper.  No photographs or video should be taken at this time. 
 When the diaper change is complete, each participant should hold their freshly changed child in the air.  The photographer should take “after shots”.  The timekeeper may determine when all diaper changes have occurred.  There is no set amount of time within which the change should take place.
 Any participant who does not properly complete the task must be deducted from the total.


At our Syracuse location, put on by Basic Baby in the Shoppingtown Mall in DeWitt, there were 48 participants. It was really exciting to see all the other parents cloth diapering and wearing their babies around the mall. I don't get out much and I don't encounter other parents often so it was really nice to see other parents with similar values. I even spotted a couple babywearing daddies. In addition to the change, it was a baby expo. There were lots of vendors for new and expecting parents. We even picked up a new pocket diaper to try by Anibums. (if you click the link, it's the flames diaper!) The woman at Basic Baby assured me it was one of her favorites. It's locally made in Cicero, NY.

Unfortunately, the official numbers for the Guinness record won't be completely totaled until Friday.

Tuesday, April 16, 2013

DIY: Stay-dry Cloth Diaper Liners


We have been cloth diapering since my son was a few weeks old. It's had its ups and downs and we've learned a lot along the way. With pocket diapers and other modern diapers, wetness isn't an issue, but we were using prefolds and covers and every time he got slightly damp, he screamed in discomfort. This wouldn't really have been a problem except he was peeing every half hour, it seemed. I desperately searched for some way to alleviate his discomfort for a little while longer and discovered stay-dry liners. I purchased a 6 pack for more money than I should have paid. And since they are one use before they need washed, 6 just wasn't enough. I did some research and found that blizzard fleece works just the same way. It allows liquid to pass through and keeps baby's skin separated from the wet diaper. It's quite remarkable how the top stays completely dry while the diaper is soaking wet underneath.

I ended up getting the blizzard fleece from Jo-Ann Fabrics. I purchased half a yard of the white and I had a 50% off coupon. The price per liner ended up being a few cents. I ended up getting about 16 13"x 5.5" liners out of the half a yard. Way better than what I initially paid for the 6. I surged around the edges but that isn't necessary. It will just help them last longer. You could just zigzag stitch or do nothing at all.


Here you can see how nicely the size fits over a prefold in a diaper cover. The size also allows for bigger babies since there is a few inches tucked in.

Tuesday, April 9, 2013

Stovetop Naan


You don't need a tandoor to make this bread. It's easy to make and you end up with a TON of naan, so I recommend freezing half of the dough for next time.

Here's what you'll need:

1 (.25 oz) package active dry yeast
1 cup warm water
1/4 cup sugar
3 Tbsp milk
1 egg, beaten
2 tsp salt
4 1/2 cups bread flour
1/4 cup butter, melted


Directions

  1. In a large bowl, dissolve yeast in warm water. Let stand about 10 minutes, until frothy. Stir in sugar, milk, egg, salt, and enough flour to make a soft dough. Knead for 6 to 8 minutes on a lightly floured surface, or until smooth. Place dough in a well oiled bowl, cover with a damp cloth, and set aside to rise. Let it rise 1 hour, until the dough has doubled in volume.
  2. Punch down dough. Pinch off small handfuls of dough about the size of a golf ball. Roll into balls, and place on a tray. Cover with a towel, and allow to rise until doubled in size, about 30 minutes.
  3. Get a large frying pan and place on stovetop at medium heat.
  4. Roll one ball of dough out into a thin circle. Place dough on pan, and cook for 2 to 3 minutes, or until puffy and lightly browned. Cover with foil while cooking. Brush uncooked side with butter, and turn over. Brush cooked side with butter, and cook until browned, another 2 to 4 minutes. Remove from pan, and continue the process until all the naan has been prepared.

Monday, March 25, 2013

Pocket Diapers


The previous type of cloth diapers I discussed were prefolds and covers. Prefolds have been around for quite a while and may seem old fashioned to many. This week I'm going to discuss one of the main types of modern cloth diapers. Pockets! There are so many great things about pocket diapers and a few draw backs that I'll go over.

First of all, pocket diapers can get pretty darn cute. They come in a variety of prints and colors from all different brands.

You get to choose your own absorbency. If you are using the diaper for nap time (like I do), you can add extra soakers into the diaper pocket.

I have NEVER ever ever had a poop blowout with one. Curious now??

They come in aplix (velcro) or snaps.

There are "one-size" varieties that you can use from birth to potty training. Oh the savings!!! Below is the same brand of diaper on the smallest setting (about 8 lbs) and on the largest setting (about 35 lbs)


The only real downside I can think of with these types are the repelling that happens if you get buildup on the material. It happens every couple of months with mine since we have hard water. All you need to do is strip them in the wash and they are back to new. Stay tuned for my washing routines.

Monday, March 18, 2013

DIY: Reusable Sandwich/Snack Bag


I've been wanting to make a reusable sandwich bag for a long time now. Not only will you save on plastic bags, your lunch will look a whole lot cuter. It took me a while to finally sit down and make one. I was mulling over the course of action to take for the entire week. There are quite a few different ways to make these and to be honest, I just winged this. I am happy with the way it turned out and I learned many lessons along the way. I will share what I learned with you so that you can bypass the learning curve.

I started with a color coordinating PUL fabric and regular fabric. Any woven cotton should be fine. My fabric is a printed duck canvas I found in the scrap bin at Hobby Lobby and the PUL can be found in the Babyville section at your local Jo-Ann Fabrics. You don't really need the PUL if you can't find it or don't want it. The purpose of it is to make your bag waterproof. If you are only planning to use your bag for sandwiches or snacks you shouldn't need it. Things like fruit or veggies, you might want to consider adding it.


To make mine sandwich-sized, I cut 7" by 17.5" rectangles, but you could make any size you want.

The next step is to place your fabrics color/print side together and pin around the edges. This is the first place I encountered a problem. I first tried to sew with PUL side down. Unfortunately, the white side of the PUL is a plastic. It stuck to my sewing machine and bunched. Luckily I caught it before it did any damage to the material. Then I tried it reverse, with the PUL up and the canvas down. Still not quite good. I don't have a walking foot, so I used a rolling foot. It still wasn't super, but it worked a bit better. So, if you are going to use the PUL, i'd recommend using a walking foot, or just skip the PUL altogether.

Sew about a quarter inch or less around the entire perimeter leaving about a 2-3 inch gap on one of the long sides. This is where you will be turning your fabric right side out again. When you are done, flip right side out and push the corners out gently with a pencil or chopstick or something shaped like that.


This is the next point where I made a mistake. I forgot to sew on the velcro. This made the very last step of my bag extremely difficult. But put it on NOW! Sew a strip of the loop side to the bottom of the print side, leaving about 1/4" from the edge. Flip your bag and sew a strip of the hook side to the opposite bottom on the PUL side, leaving 1/4" as well. 

Now fold PUL sides together to make your bag shape, leaving the flap where the velcro is. Fold in the bit you left unsewn and top stitch down the sides of the bag.


Now you have a sandwich bag! Just add a sandwich!


To clean your bag, simply toss it in the washing machine with any load. Turn it inside out and connect the velcro. I would recommend letting it air dry but you can also put it in the dryer on low.

Monday, March 11, 2013

Homemade Pizza


Who doesn't love pizza? We certainly do here! We love it so much we were getting delivery almost every other week. Not only is it expensive, it's really greasy. We decided to ditch the delivery tradition and start a new one. The dough isn't hard to make at all. It's even easier if you have a mixer with a dough hook. This recipe makes two 14 inch pizza crusts.


Pizza Dough:

4 cups of bread flour  (I like King Arthur unbleached)
1 tsp sugar
1 envelope instant dry yeast
2 tsp salt
1 1/2 cups warm water
2 Tbsp olive oil plus extra to grease bowl

Put the flour (I initially only added 3 and added the rest slowly after the water to ensure correct consistency), sugar, yeast, and salt in a mixing bowl. (you can proof the yeast first if you need.) Mix the ingredients. Slowly add the water, and then the olive oil, while mixing. Continue mixing until dough comes together into a ball. Turn onto a lightly floured surface and knead until it is a smooth, firm ball.

Use a little olive oil to grease the inside of a large bowl. Place the dough in the bowl and turn once. Cover the bowl with a damp towel and let sit for about an hour or until dough has doubled in size.

Punch down dough and divide into two. Knead on lightly floured surface and place in separate bowls and cover. Let the dough rest for around 10 minutes.

Now comes the fun part.


Preheat the oven to 425˚ F. Take your dough and flatten it onto your cooking surface, pizza pan, pizza stone, whathaveyou. (you can sprinkle bottom with corn meal if you like) Add sauce, cheese, and toppings however you like. Bake for 18 minutes and enjoy!


Ours has tomato sauce, mozzarella cheese, and turkey pepperoni. It was delicious!

Monday, March 4, 2013

Prefolds and Diaper Covers


The first type of cloth diaper I'd like to discuss in depth would be the prefold. I consider it to be not only the most economical, but also the most fool-proof diapering method. They can be made to fit around your baby with pins, a snappy, or boingos (I'll get to all those later) or tri folded and laid inside a cover. They don't repel liquid so you will rarely, if ever, have to worry about them leaking. I've never had a prefold leak. They also become more absorbent the older they get.

Washing prefolds is less of a hassle than other types with synthetic fibers since you don't have to worry as much about buildup and repelling. You should still use a cloth diaper safe detergent and no fabric softeners or dryer sheets since the fabric will be next to your baby's skin for long periods of time.

Prefolds and covers, in my opinion, provide the most bang for your buck. Prefolds cost anywhere from one dollar to about 3 per, depending on size, for cotton. If you go for a hemp option, they are a bit more pricey at 7 dollars a piece. Covers can range from 10 - 20 dollars or so. The prefold itself is what gets changed during a routine diaper change. A cover can last usually around 2 days, as long as no solid waste gets on it.

This is really the beginning of my cloth diaper series so links to more information will be added as I go along so feel free to keep checking back to your favorite diapers for future updates.

 Diaper rite size medium prefold in a newspaper fold and secured with bongos.
 Flip one size diaper cover in mirror.
Flip one size diaper cover in sassy with Osocozy better fit prefold in size infant.

Monday, February 25, 2013

Kick Canned Beans to the Curb


Canned beans or dry? I started using dried beans about a year ago after BPA in can linings really came to light. I try to reduce the amount of canned foods I use and dried beans is one great way to cut back.

What is BPA and why should you care? Well, BPA, or Bisphenol A, is a substance that mimics estrogen. It is linked to many health problems such as obesity, cancer, and thyroid problems. You can read more about it here. It has been declared a toxic substance and has recently been banned from baby bottles. So, it's not something you'd really want in your food.

Other than the health reasons stated above, two other solid reasons to use dry instead of canned are that they are MUCH cheaper and when kept in the right conditions they will quite literally last forever. At my local grocery store, the store brand canned great northern beans are 79 cents for a 15 oz. can. A one pound bag of Goya great northern beans cost $1.69. Doesn't sound like a big deal until you realize the fact that you can get about 5 cans out of one bag. That's a savings of $2.26. You can even buy the organic dry beans and still save money.

As for the storage, I like to keep mine in mason jars in a cool dry cupboard. They will last a very long time but they do take longer to cook the older they get. Do they seem a little too old for your comfort? Make a bean bag!

How to use dry beans:

Pick through your beans to make sure there are no small rocks or creepy looking beans.

1/2 cup of dry beans is equal to one 15 oz can

Place your desired amount of beans in a large bowl and fill bowl to the top with water. Let it sit overnight.

For best results, I recommend cooking your dish in a crockpot on low for at least 6 hours. If you don't have the time or means for this, boiling works just fine, too.

Monday, February 18, 2013

Best Banana Bread


Something that is always in my kitchen is bananas. If I didn't know any better, I'd swear my husband leaves them to get extra ripe so that I'm forced to make banana bread. (I hate wasting anything) I found this recipe over a year ago and have been tweaking it ever since. I feel that I've got it to the perfect point. This recipe has only failed me twice. The first failure was the first time I made it, recipe as found. The second failure was after hubby tinkered with the oven and now it heats up about 15 degrees hotter, so I had to adjust my baking temperature. All that aside, this recipe has a strong banana flavor and is a little on the sweeter side. It's really more cakey than bread-y and it's super moist. Enjoy!

2 c. unbleached white whole wheat flour
1 tsp. baking soda
1/4 tsp. salt
1/2 c. butter
3/4 c. brown sugar
2 eggs
3 ripe bananas
pure vanilla extract
pure cane sugar, to sprinkle (Sugar in the Raw or Woodstock brands work well)

Plan ahead: set the butter and eggs out until they are at room temperature.

Preheat oven to 350 degrees F. Grease a 9x5 loaf pan or use a stoneware loaf pan (ungreased, of course). Get out three bowls, one large and two medium (or if you have one, just throw it all into the Kitchen Aid mixer). In large bowl, combine flour, baking soda, and salt. In second bowl, cream the butter and brown sugar together. In the third bowl, place the peeled bananas and mash. (I use an old-fashioned potato masher but a mixer or other device should work just as well). Stir the eggs in with the bananas and add a splash of the vanilla extract. Mix until blended well. Add the banana mixture into the brown sugar mixture and stir well. Add that bowl into the flour mixture and stir until blended together. Pour into your pan and sprinkle with cane sugar. Bake for one hour. Let it sit for 10 minutes before removing it from the pan. Enjoy!


Monday, February 11, 2013

Cloth Diaper Stash


Who doesn't love snooping through other people's cloth diaper stashes? Mine isn't that extensive or impressive but I love it all the same.


 Official list:

Pocket Diapers
1 bumGenius 4.0 in Albert
1 Rumparooz One Size in Platinum
1 Thirsties Duo Diaper size 1 in Meadow
1 Kawaii Goodnight Diaper in Lime Dot
4 FuzziBunz Elite One Size in Watermelon, Kumquat, Spearmint, and Grape
4 Diaper Rite One Size Pocket in Parrot, Dandelion, Nessie, and Black

Covers
1 Rumparooz One Size in Pumpkin
1 Blueberry Coverall in Cow
1 Thirsties Duo Wrap size 1 in Blackbird
2 small covers made by me in Monkey and Owl prints (not shown)
6 Flip One Size in Butternut, Ribbit, Moonbeam, Bubble, (Sassy and Mirror not shown)

Flats and Prefolds
4 prefolds made by me
12 Diaper Rite unbleached birdseye cotton flats
23 Osocozy unbleached prefolds size infant

Miscellaneous
1 Snappi in Mint Green
1 Boingo set in Yellow
1 Planet Wise medium wet bag in Lime Cocoa Bean
1 Planet Wise Wet/Dry bag in Laughing Leaf
2 Kissaluv's Antibacterial Pail Liners
6 wool dryer balls made by me
10 HempBabies hemp doublers

There you have it. If you're curious about anything on the list or want more information or my opinions just let me know! I'd be happy to help. Also, there will be future posts for more detailed descriptions of each type I have, how I use them, how I like them, and eventually my wash routine.


Monday, January 28, 2013

Crockpot Cheesy Potato Soup


I love my crockpot. It's definitely one of my most favorite kitchen appliances. When I first discovered "crocking" I felt like a sucker for not having done it sooner. There are few feelings greater than having dinner ready in the morning and not having to worry about it for the rest of the day. One of my family's favorites is cheesy potato soup.

Ingredients:
6 medium potatoes, diced
2 1/2 cups water
1/2 cup chopped onion
2 chicken bullion cubes
1/4 tsp pepper
2 cups shredded sharp cheddar cheese
1 12oz can evaporated milk

Directions:
Combine all ingredients except cheese and milk in crock pot. Cook on low for 8-9 hours. Add the cheese and milk and cook on low for another hour.


Monday, January 21, 2013

Roasted Butternut Squash Seeds


Butternut squash is one of my son's favorite foods. I was cutting one up today and I remembered my husband saying that the seeds were edible like pumpkin seeds. I am usually in a hurry when making his baby food and this time I wasn't and I decided to save the seeds. I set them aside in a bowl until I was done. After a good rinsing and picking off all the squash goo, I placed them in a bowl and added one tablespoon of olive oil and a bit of salt and spread them out on a cookie sheet. Put them in the oven at 275˚F for 30 minutes. They make a great snack and they are packed full of good stuff. They would be great for taking camping or on hikes. You can read the nutrition facts for yourself here.


My final verdict is that they are seriously tasty. I'd recommend these if you like salty crunchy snacks like I do. Better than chips, in my opinion! Enjoy!


Monday, January 14, 2013

Tips from the Box #1


Every once in a while I have a discovery immediately followed by "why have I been making things harder on myself?"

 Figuring out babies and all the "baby stuff" that comes along with them is a daunting task. One of the many things I had overlooked before my son was born was a laundry basket for the nursery. We were keeping his dirty clothes in a pile on the floor and eventually started using an old laundry bag hung on the door. At the time I was doing laundry probably about every other day because, well, babies are messy. The worst part of laundry was trying to find all those little socks. Sometimes they were stuck inside sleeves or pant legs. Sometimes they just completely vanished. We eventually got a standing laundry basket and it came with a lingerie bag. It sat on top of his dresser for the longest time before...*epiphany*


Saturday, January 12, 2013

Homemade White Bread


I didn't intend for the first post to be about bread. This blog won't be so literal. It's just that in the past week, I've baked two loaves and thought it would be a good topic since it's what I am currently doing. I received a highly coveted Kitchen Aid stand mixer for Christmas from my husband. Since then, I've been baking a lot more. It's just easier. I used to make bread a lot before my son was born and I did ALL the mixing by hand. Oh the pain. But I believe these experiences are what give us a greater appreciation for things like stand mixers with dough hooks.

I can't take credit for the original recipe, which I found here. It makes a nice light white bread with a very crispy crust. It's great for sandwiches, toast, mopping up soups and stews, or smothered in butter or preserves. You can either check out the original recipe or follow mine below. I only made a few small alterations.


Ingredients:
2 packets of active dry yeast, I use the rapid rise
1 Tbsp unrefined sugar such as Sugar in the Raw or Woodstock
2 cups water
1 cup milk
2 Tbsp butter
6 cups bread flour, I use King Arthur unbleached
1 Tbsp salt

Directions (same as original):
  1. In a small mixing bowl, dissolve yeast and sugar in the warm water. Let stand until creamy, about 10 minutes.
  2. In a large mixing bowl, combine the yeast mixture with the milk, the butter or margarine, 4 cups of the flour and the salt; stir until well combined. Add the remaining flour, 1/2 cup at a time, stirring well after each addition. When the dough has pulled together, turn it out onto a lightly floured surface and knead until smooth and supple, about 8 minutes.
  3. Lightly oil a large mixing bowl, place the dough in the bowl and turn to coat with oil. Cover with a damp cloth and put in a warm place to rise until doubled in volume, about 1 hour.
  4. Preheat oven to 400 degrees F (200 degrees C).
  5. Deflate the dough and turn it out onto a lightly floured surface. Divide the dough into two equal pieces and form into loaves. Place the loaves into two lightly greased 9x5 inch loaf pans. Cover the loaves with a damp cloth and let rise until doubled in volume, about 40 minutes.
  6. Mist loaves with water and bake at 400 degrees F (200 degrees C) oven for 20 to 30 minutes or until the loaves are golden brown and the bottom of a loaf sounds hollow when tapped.


I haven't yet found a wheat bread recipe that I am 100% happy with but when I do I'll be sure to share. I hope you enjoy this recipe as much as I do.